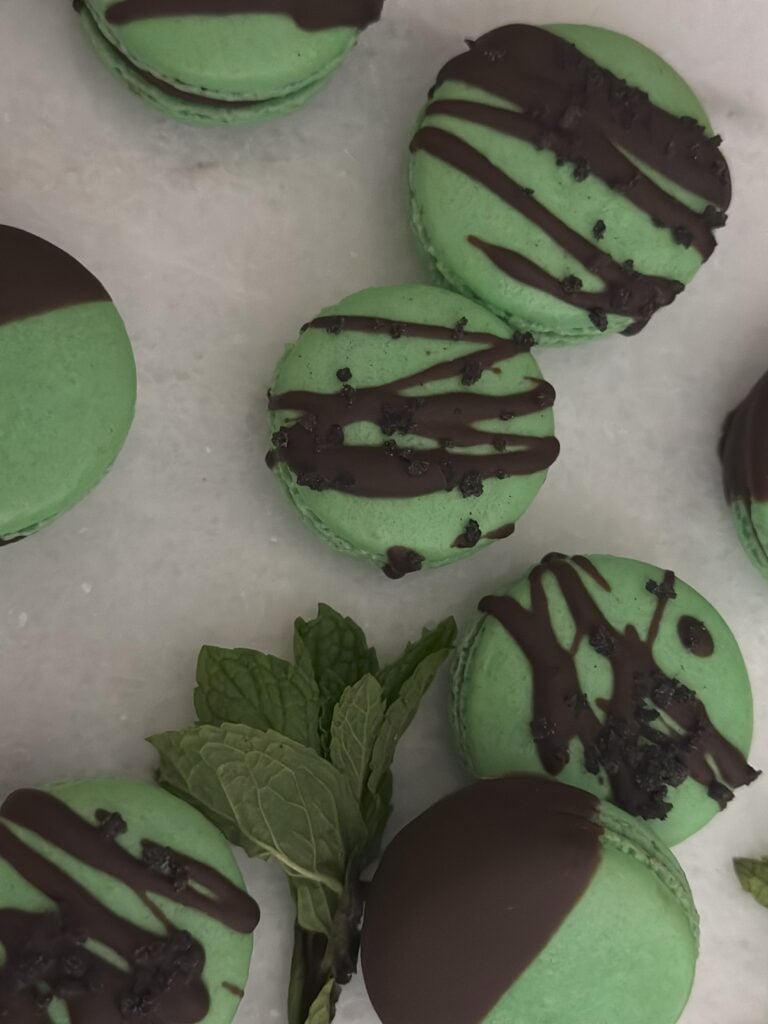
Mint Chocolate French Macaron Recipe
Mint and chocolate…a classic combination, and for good reason…it’s so good! Boasting a mint shell, with mint chocolate ganache in the middle, then dipped in chocolate or drizzled with chocolate. Mmmm! Sign me up!
Like peanut butter and jelly; mint and chocolate are made for each other. Mint and chocolate complement each other so well—the refreshing flavor of mint pairs perfectly with the rich, dark flavor of chocolate.
What kind of meringue is that?
There are three ways the meringue can be made for macarons-French, Swiss, and Italian. The Italian method uses a hot sugar syrup whipped into the egg whites to make the meringue. The Swiss method involves heating up the sugar and egg whites and then whipping them into a meringue. As you’ll see, the French method uses neither of those techniques and is the easiest of the three methods.
Ingredients

Macarons use just a few ingredients, so get the best quality you can. The almond flour needs to be fine-ground and made with blanched almonds. We don’t want any almond skin in the flour. Also, do not use almond meal.
- Almond flour Fine ground
- Powdered sugar
- Egg whites
- Granulated sugar or caster sugar
- Cream of tartar
- Extract and food coloring We’re using mint extract in the shells and filling. For the food coloring, be sure to only use gel or powder. Liquid food coloring can make the batter too wet.
Chef’s Take
I really love this pairing of mint chocolate macarons. It’s such a classic flavor. They make a perfect holiday macaron to put into your cookie box for gifting. I especially love how elegant they look. Once you’ve made them a few times, you’ll see they aren’t difficult to make. And everybody loves them!
Let’s Make This!
There aren’t too many steps needed to make macarons; they just have to be exact. The ingredients need to be weighed, the egg whites whipped to the right consistency, and the macaronage mixed just right. Sounds simple! If you follow these tips, and the recipe card below, you’ll be well on your way to making some delicious mint chocolate macarons. I also have a Beginner’s Guide to French Macarons that you may find helpful.


Homemade Macaron Tips
Tip 1 Weigh the ingredients. This is really important when making macarons as they are finicky enough without getting the amount of ingredients wrong. You can find an inexpensive kitchen scale at most grocery stores, and definitely on Amazon.
Tip 2 Wipe down the bowl you will be whipping the egg whites in with vinegar or lemon juice. I also wipe the whisk down and the bowl that I separate the egg whites into. We want to make sure there is no fat residue in the bowls where the egg whites will be. Fat doesn’t allow the egg whites to whip into a beautiful meringue.
Tip 3 Only use glass or metal bowls to make the meringue. Plastic bowls can hold onto fat residue which is bad for making our meringue.
Tip 4 I highly recommend using a stand mixer if you have one. You can use an electric hand mixer, but it will be more work on your arms and hands.
Tip 5 Be sure to complete the figure eight test. This tests the batter for the correct consistency. Once you’ve folded the meringue and flour mixture until it reaches a flowing honey consistency, make a figure eight with the batter. The batter is ready when the figure eight sinks back into itself in 10 seconds. Let the batter drip off the spatula in a stream and use this to form the figure eight. If it takes longer than 10 seconds, perform a few more folds before doing the test again. Once you’re batter has reached the right consistency, stop mixing, it’s ready.

Tip 6 You’ve made your batter and piped it onto your prepared trays. Now it’s time to get rid of air bubbles. Bang the trays on the countertop firmly a few times to release trapped air. I also like to go through with a toothpick and pop any remaining bubbles I see. Trapped air in the shells can lead to cracked tops so it’s important to get rid of any air bubbles you see.
Tip 7 Make sure the macarons have formed a skin before you bake them. This is important because, without the skin, macarons will have a difficult time rising. A weak skin can also lead to cracks. In normal humidity, it can take around 30 minutes to form the skin. If its drier out, it can take less time. It it’s more humid out, it can take over an hour. You’ll know they’re ready when you can touch the macarons and no batter transfers to your finger. They will feel firm and you’ll be able to lightly run your finger over the top of them.
Tip 8 I prefer using silicone mats over parchment paper. They are reusable, and conduct heat more evenly. You can also find them with the circles printed on them, making piping the batter a lot easier. Silicone mats can hold onto stains, so I have a set that I use just for baking macarons.
Filling and decorating Mint Chocolate Macarons
To fill the macarons, I made a dark chocolate ganache. A ganache is simply melted chocolate and heavy cream. The heavy cream is heated up in the microwave or on the stove, then poured over chopped chocolate. Stir the mixture until all the chocolate has come together and is smooth, and there’s your ganache. You can add a bit of butter to help make it smoother, but it isn’t necessary. It has to sit for a bit to get thicker, but you don’t want it to solidify. I use this same ganache to decorate the macarons. Once you’ve filled and sandwiched the macarons, drizzle the ganache over the macarons. You may need to microwave the ganache to make it more pourable. Don’t make it runny though. Use 5-second bursts, stirring in between, until you reach the right consistency. I used a spoon to drizzle the ganache as I like the free-form look. You could use a tiny squeeze bottle if you want more uniform stripes. To get chocolate on half of the macaron, just dip them into the ganache then lay them on some wax paper to harden.

More Macaron Recipes to Try
- Pumpkin Spice Macarons
- Cranberry Spice Macarons
- Fig and Honey Macarons
- Peppermint White Chocolate Macarons
Frequently Asked Questions
For maximum flavor and freshness, store macarons in an airtight container on the counter for up to 24 hours. Layer them with parchment paper. Do not use wax paper as it will stick to the macarons. You don’t want to stack them too high as they are a delicate cookie. Store them the same way in the fridge for up to one week.
To freeze the shells, first lay them in a single layer on a large baking sheet to freeze. Once frozen, transfer them to a freezer-safe container. Line the container with parchment paper, and put parchment paper on each layer of macarons. Freeze them for up to one month. Thaw the macarons in the fridge overnight and decorate as normal.
To freeze filled macarons, follow the same instructions. Not all filled macarons freeze well, due to the type of filling they have. Buttercream and ganache would freeze well. Fillings like jams or curds would not hold up well after being thawed out, so it is recommended not to freeze those types.
There are a couple reasons your macarons could be cracking. If you don’t give them a long enough resting period, they could crack. Remember, they need to be dry on top. Depending on your climate, this could take anywhere from 10 minutes to over an hour. If you don’t whip the meringue to stiff peaks, it will be weak thus making the macaron shells weak and more prone to cracking. You could also have a too high oven temperature. You may want to invest in an oven thermometer to be sure your oven is set to the right temperature.
I recommend using light baking sheets. Dark baking sheets hold onto heat longer, which could cause your macarons to crack. Line the sheets with silicone mats or parchment paper.

Mint Chocolate French Macarons
Ingredients
Macaron Shells
- 130 grams almond flour-fine ground
- 130 grams powdered sugar
- 105 grams egg whites
- 75 grams granulated or caster sugar
- 1/4 teaspoon cream of tartar
- 1/2 teaspoon mint extract
- 3 drops green gel food coloring
Peppermint Ganache Filling
- 1 Tablespoon butter
- 6 ounces baking chocolate bar, semi-sweet
- 1/2 cup heavy cream
- 1/4 teaspoon mint extract
Instructions
Macaron Shells
- Separate the egg whites (105 grams) from the yolks about 24 hours ahead of when you will be making the macarons. Don't worry if it's not quite 24 hours. To separate the eggs, crack the shell as close to the middle as you can get. Pass the yolk back and forth between the half shells until all of the whites have separated out into your bowl. You may want to do this over a small bowl first in case some of the yolk gets into the whites.
- Line two large baking sheets with either silicone mats or parchment paper. Set them on a flat surface.
- Weigh out the almond flour (130 grams), powdered sugar (130 grams), and granulated or caster sugar (75 grams) into separate, small bowls. Use superfine flour so you get smooth tops. Using a fine mesh sieve, sift the powdered sugar and almond flour.
- Using a stand mixer or an electric hand mixer with the whisk attachment, add the egg whites to a clean metal bowl. Add the cream of tartar (1/4 teaspoon) and mint extract (1/2 teaspoon). Whip the egg whites on medium speed until they become foamy and the whisk leaves track marks in them. Now it's time to add the granulated sugar. Add the sugar in 3 separate batches with the beater running on low speed. Once you've added all of the sugar, turn the beater on high.
- You will see the egg whites begin to build volume and start to look a little more solid. They will also turn a bright white color. After about 5 minutes, stop and check for doneness. They will most likely not be done and will still be runny. Continue whisking. The egg whites will start to look thick and the whisk will leave deep track marks. You are looking for the egg whites to form stiff peaks. This is when you remove the whisk from the egg whites and they come to a point without melting away. They will form a 'peak' with possibly just a slight curve. You will also be able to turn the bowl upside down and they will not move. This is the meringue. Add 3 drops of green food coloring to the meringue. You don't need to mix it into the meringue, it will mix in once you start folding it into the flour/sugar mixture.
- Add the meringue to the almond flour/powdered sugar mixture in 3 batches. You won't be able to mix it all together until you've got all the meringue in there, but it's easier to do it this way. It will look very dry at first. As you continue mixing, it will come together. I like to use a spatula with a rounded side. It seems to move along the bowl easier, allowing me to scrape the sides and fold everything inward. The mixing is what takes the air out of the batter, allowing it to form the honey-like consistency we are looking for. The batter should flow off your spatula like honey without breaking, and you should be able to form a figure 8 with the batter that's flowing off the spatula. It should sink back into itself in 10 seconds. Then it's ready.
- Using a large pastry bag and a small, round tip (I like the Wilton 12 tip), fill the pastry bag with the batter. I like to use a large cup to set the bag into. Twist the bottom just above the tip and fold it over before putting it in the cup. This will prevent the batter from pouring out the bottom into the cup. Fold the sides over the cup and spoon the batter into the bag.
- Take the cup over to where your prepared pans are. Lift the bag out of the cup, hold the top closed, and gently squeeze the bag to push the batter down towards the tip. Work quickly as the batter will keep flowing out of the tip once it starts. If you have the mats with the macarons stenciled on them, then aim for the middle of each stencil. There should be a dot in the middle. Holding the bag upright, count to four and gently squeeze the batter onto the mat. Repeat this process until you have filled all of the circles or run out of batter.
- Bang the trays firmly on your countertop to remove any air bubbles. I also go through with a toothpick and lightly pop any air bubbles I see. Let the macarons rest for 30-40 minutes (longer if it's humid out) so they can form their 'skin'. You should be able to lightly touch the tops of the macarons without getting any batter on your finger, and they will feel smooth.
- Now it's time to bake them. Bake each tray one at a time on the middle rack for 13 minutes in a 315 F oven. The macarons will look matte on top, and they will not jiggle when you move the pan. I like to preheat my oven about halfway through the macarons resting.
- Once the macarons are done baking, let them rest for 10 minutes before removing them to a baking rack to continue cooling down. Once they're cooled down, they can be filled.
Peppermint Ganache Filling
- Chop the chocolate up into smaller pieces and put them into a small mixing bowl.
- I find the easiest way to make the ganache is to heat the milk up in the microwave, but you can also use the stovetop. Put 1/2 cup of heavy cream in a microwave-safe glass measuring cup. You'll need to use one that's at least a 1-cup size. For such a small amount, it won't take very long so don't walk away from the microwave. I usually set it for 2 minutes and once I see it start to bubble, I stop the microwave. You can quickly get a mess if you don't watch it.
- Once the cream is done heating up, remove it from the microwave. The container will be hot so you may want to use a towel to remove it. Pour the cream over the chopped chocolate and let it sit for 30 seconds before starting to mix it together. Add 1 tablespoon of butter and 1/4 teaspoon of mint extract. Continue mixing until all of the chocolate is melted and the mixture is smooth. Set it aside to cool down and thicken. You want it to be thick enough to pipe onto the macaron shells. Surprisingly, it doesn't have to be as thick as you think it should be to pipe well. You can stick it in the fridge for a bit, but you don't want it to harden so you'll have to pay close attention to how long it's in there. If it does get to hard, you can stick it back in the microwave.
Notes
- For maximum flavor and freshness, store macarons in an airtight container in the fridge for up to one week. Layer them with parchment paper. Do not use wax paper as it will stick to the macarons. You don’t want to stack them too high as they are a delicate cookie.
- For best results, follow the recipe as written.
- Be sure to only use gel or powdered food coloring. Liquid food coloring can make the macaron batter too wet.