Tiramisu French Macarons
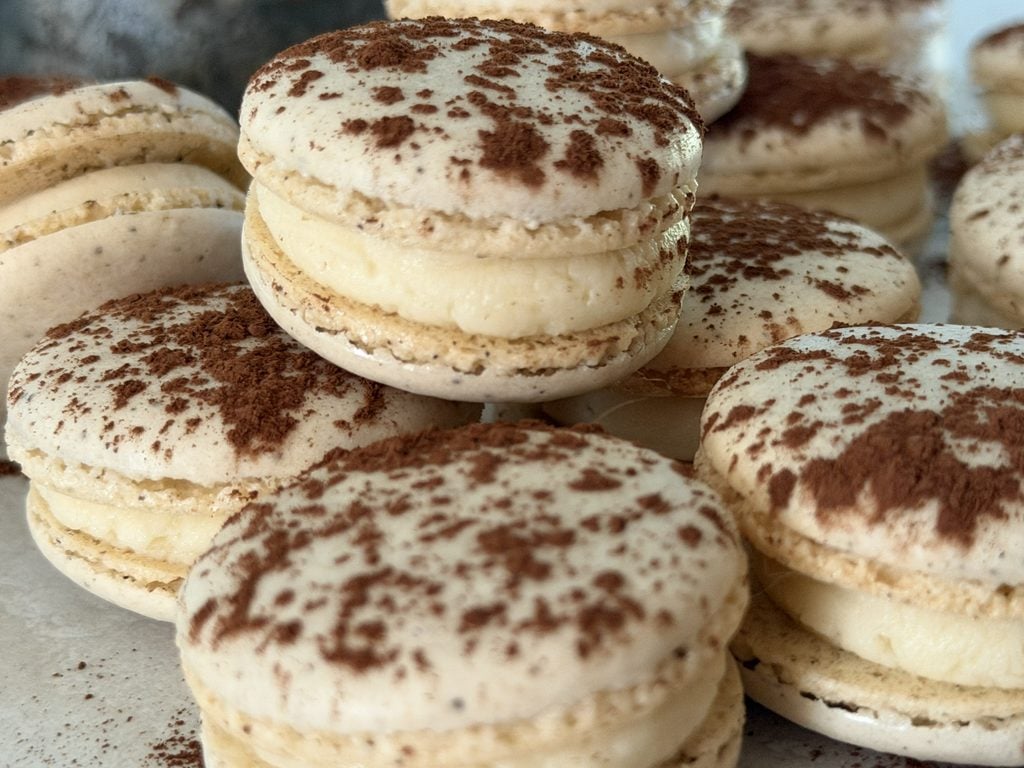
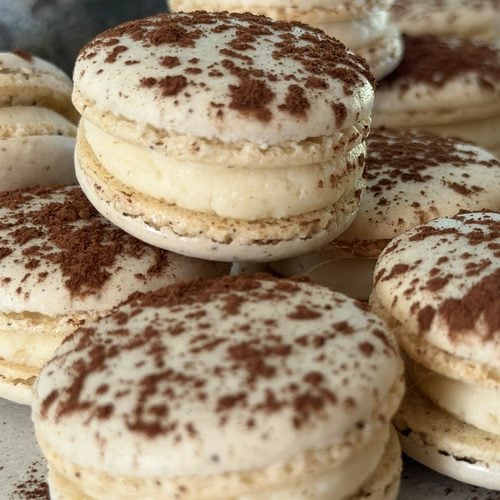
Tiramisu is hands down one of my favorite desserts. I love how light and creamy it is, with the perfect amount of espresso and chocolate powder sprinkled on top. These macarons taste like mini versions of tiramisu, with their crispy and chewy shells, creamy mascarpone espresso filling, and cocoa powder dusted on top. Welcome to your new favorite macaron.
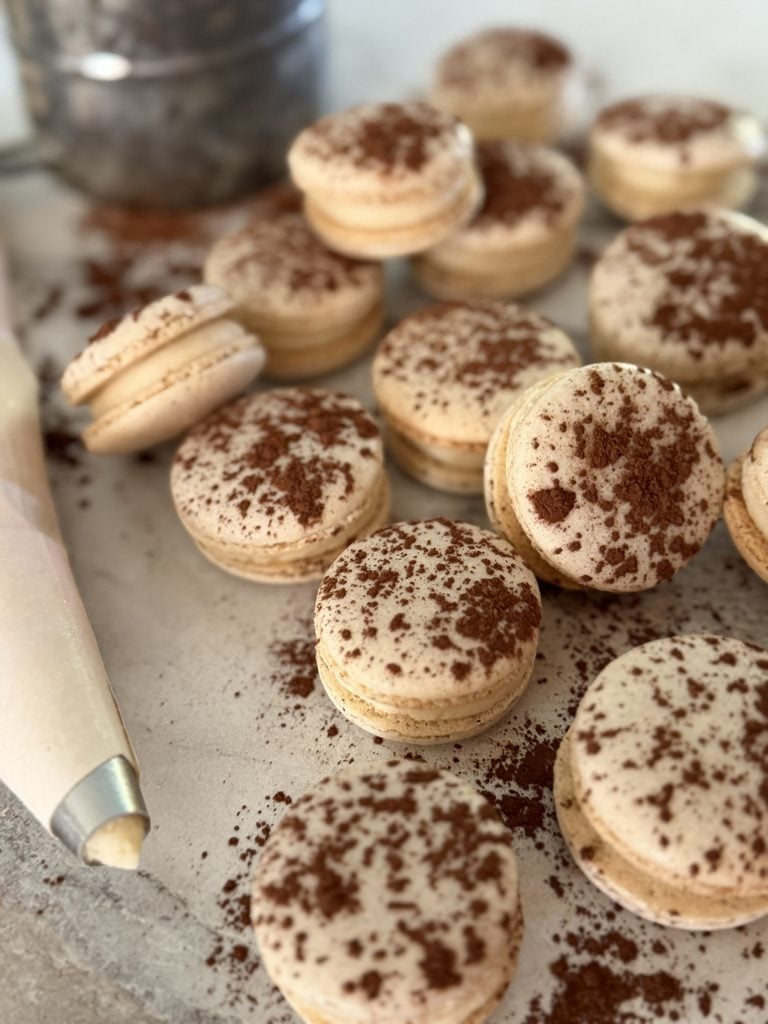
Did I say Tiramisu is my favorite dessert? Well, I said it again because it is. And these mighty little cookies do not disappoint. They taste exactly like Tiramisu. It’s like having a mini version of the iconic Italian dessert.
These macarons would be a fun addition to a dessert spread, especially for a dinner party or holiday gathering. You could even package a few in a cute little box for a hostess gift.
The Macaron Experience
I love having a macaron when I want something sweet but don’t want to have too much. They’re the perfect size for a little pick-me-up. And tiramisu macarons are perfect with your morning coffee, your afternoon coffee, your evening coffee, your anytime coffee…. you get the drift. Basically, enjoy these anytime.
For more macarons inspired by Coffee House flavors, check out my Coffee House Macarons roundup.
Ready to make them? Don’t worry-these macarons are easier to make than they look. Check out my Basic French Macarons for Beginners post for all the tips and tricks for making the perfect macaron.
Ingredients
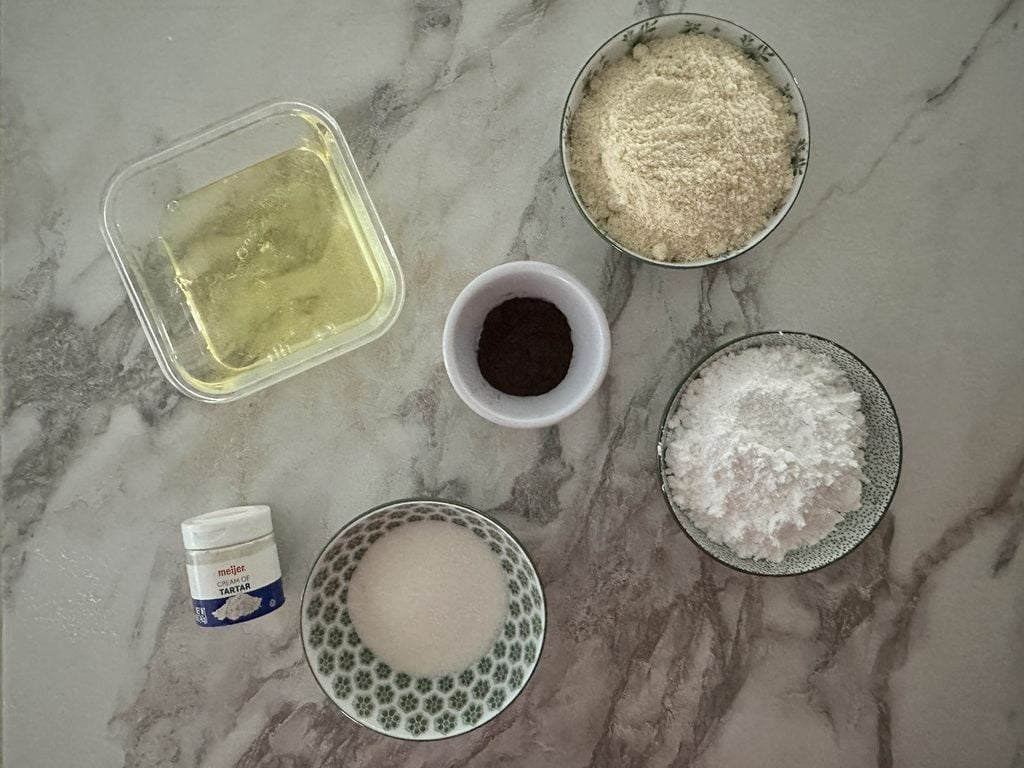
Just a few, high-quality ingredients are needed for macarons.
- Almond flour Make sure it’s finely sifted for those smooth shells.
- Powdered sugar Adds sweetness and helps create the smooth shells macarons are known for.
- Egg whites From fresh eggs, no liquid egg whites here. I like to separate my egg whites ahead of time. It makes the whole process flow smoother if you do this. Plus, it gives the egg white proteins a chance to relax, helping to form a stronger meringue. 24 hours ahead is great, but I also will do it the morning I am making the macarons.
- Granulated sugar Sugar helps the egg whites whip into a beautiful meringue.
- Cream of tartar Helps with the stability of the meringue.
- Espresso A bit of brewed espresso will give the filling that classic tiramisu flavor.
- Cocoa Powder For dusting the tops of the macarons.
Candace’s Tip: Be sure to only use glass or metal bowls to whip egg whites in. Plastic harbors fat residue which will prevent your egg whites from whipping into stiff peaks.
Let’s make tiramisu macarons
Step 1- Making the macaron shells
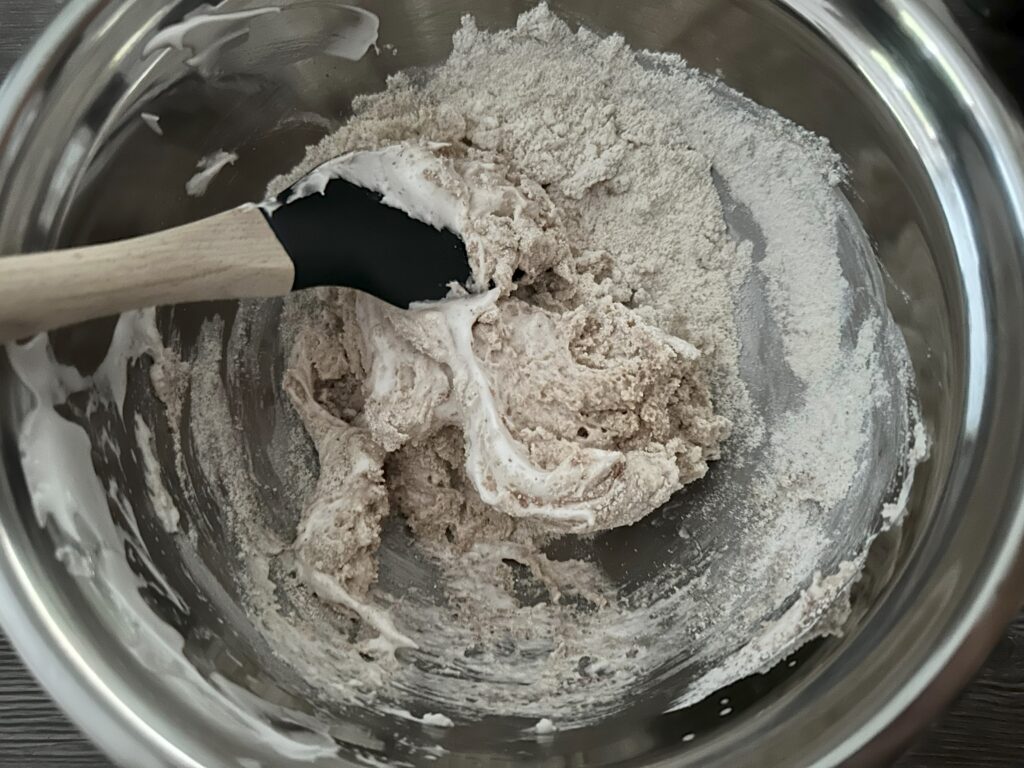
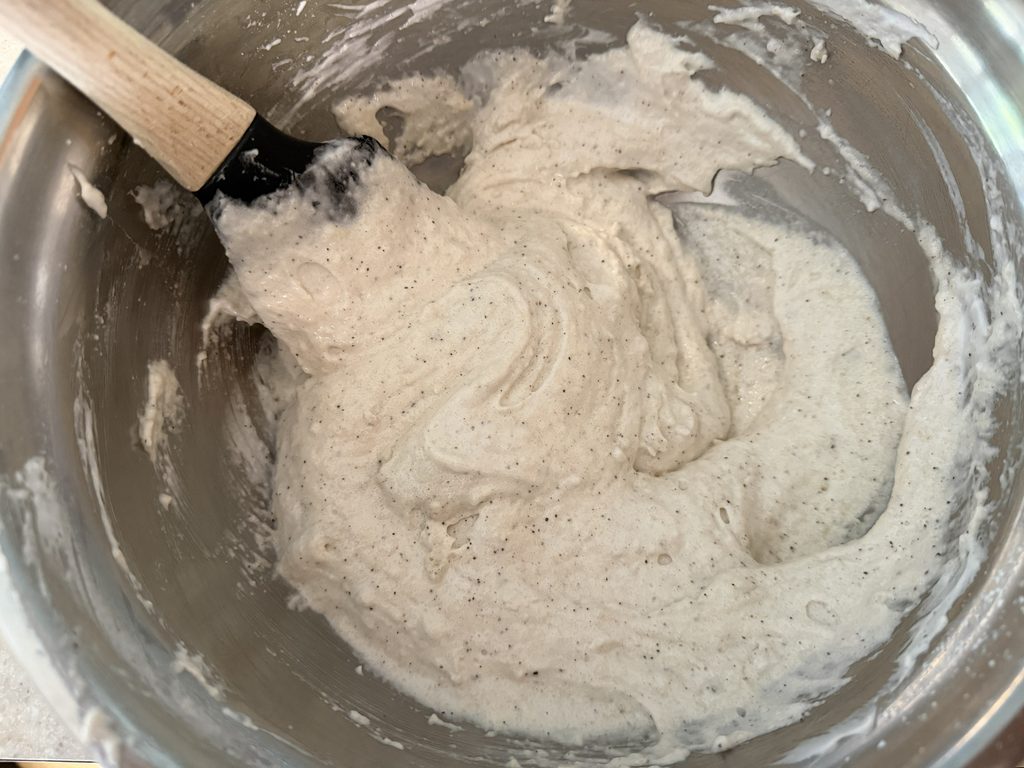
Macarons are intimidating at first, but once you get the hang of them, they become easier and easier to make. At the core, you’re just whipping egg whites into stiff peaks (the meringue), then mixing the meringue with sifted almond flour and powdered sugar to form the macaron batter, known as macaronage.
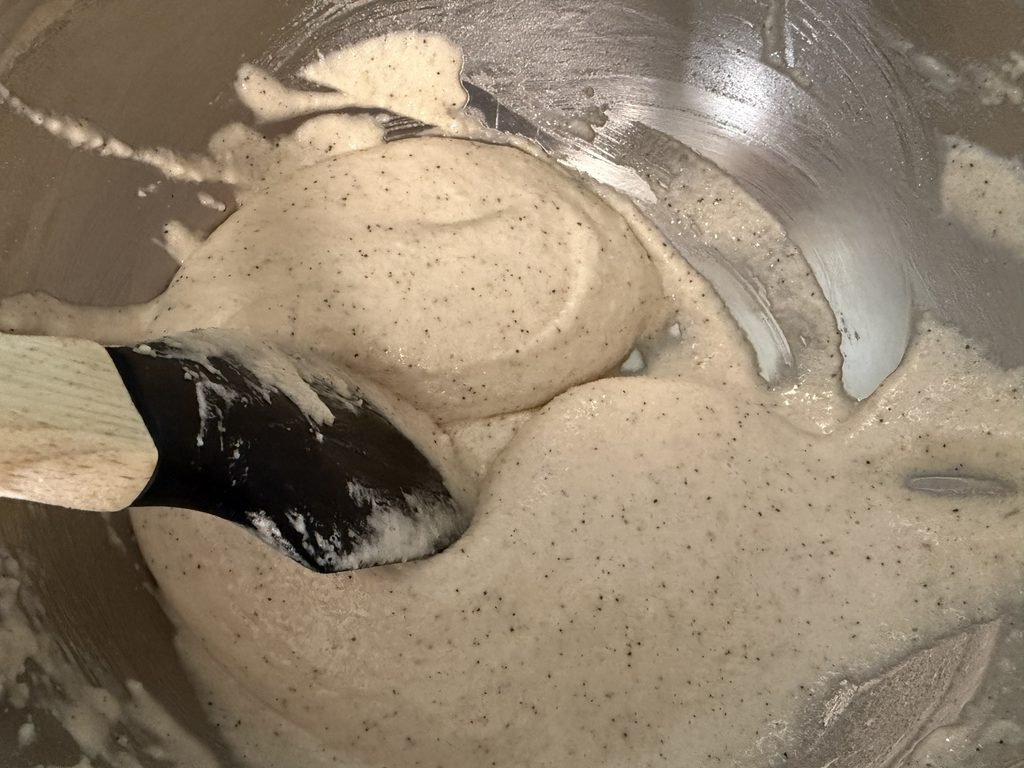
- The batter should be the consistency of honey
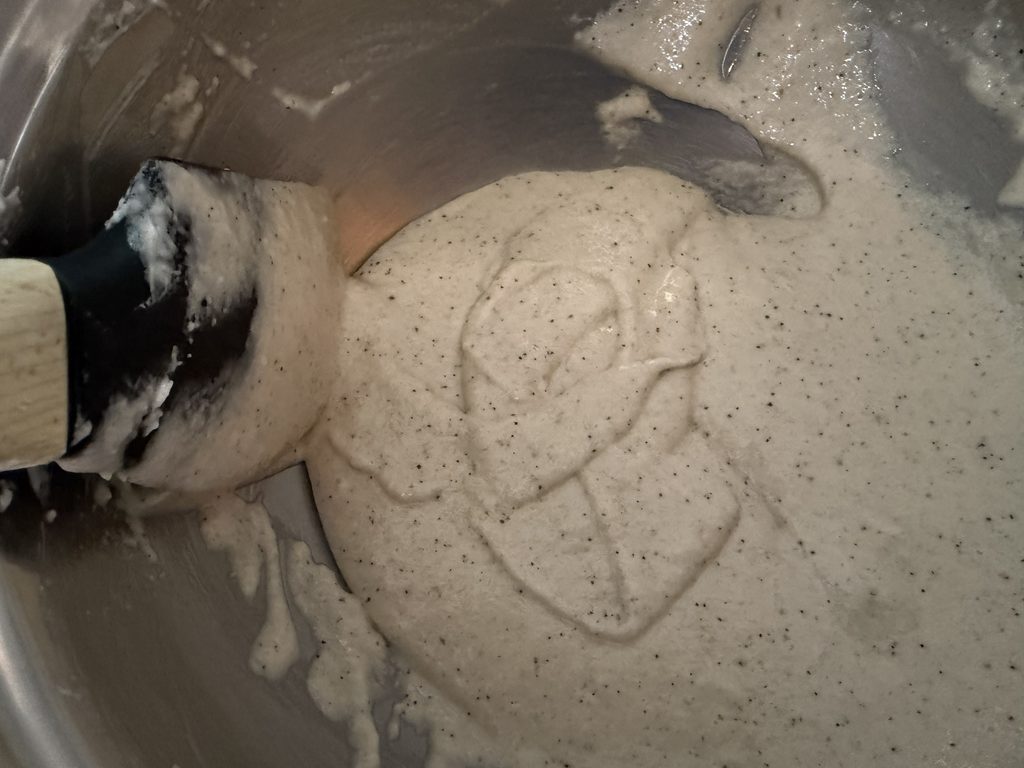
- Use the ‘figure eight’ test to check readiness before piping
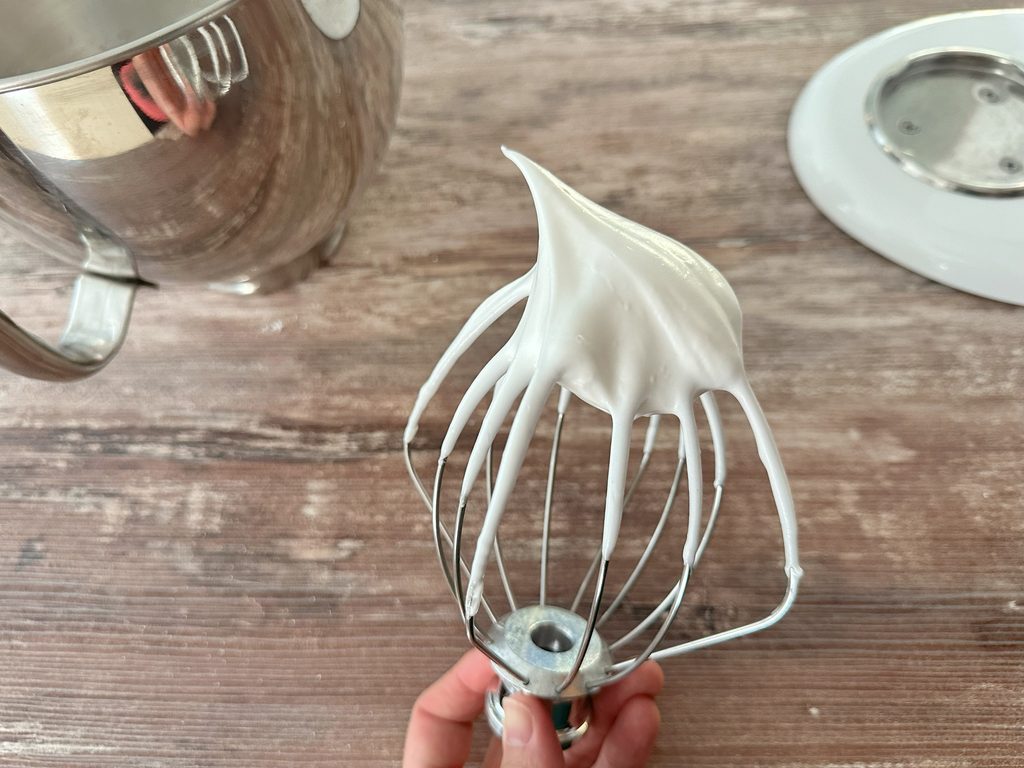

Pro Tip: Do not use liquid egg whites or meringue powder. Liquid egg whites are pasteurized, which is not ideal for making meringue. Meringue powder is not strong enough to form and hold stiff peaks.
Step 2- Pipe and dry the shells
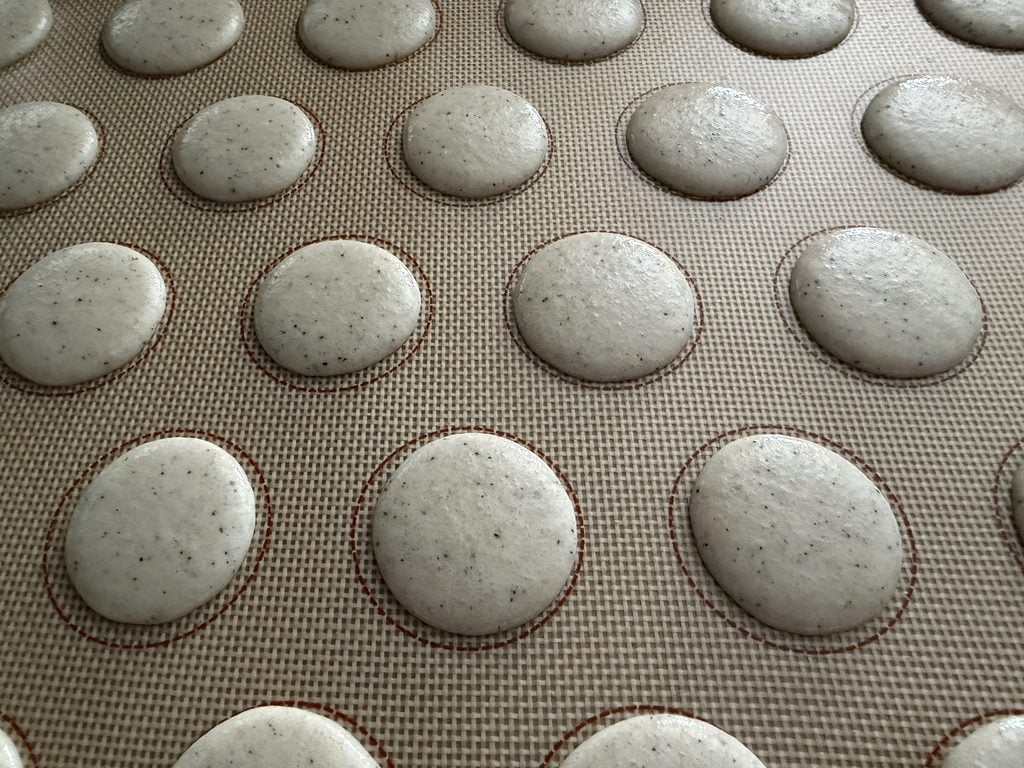
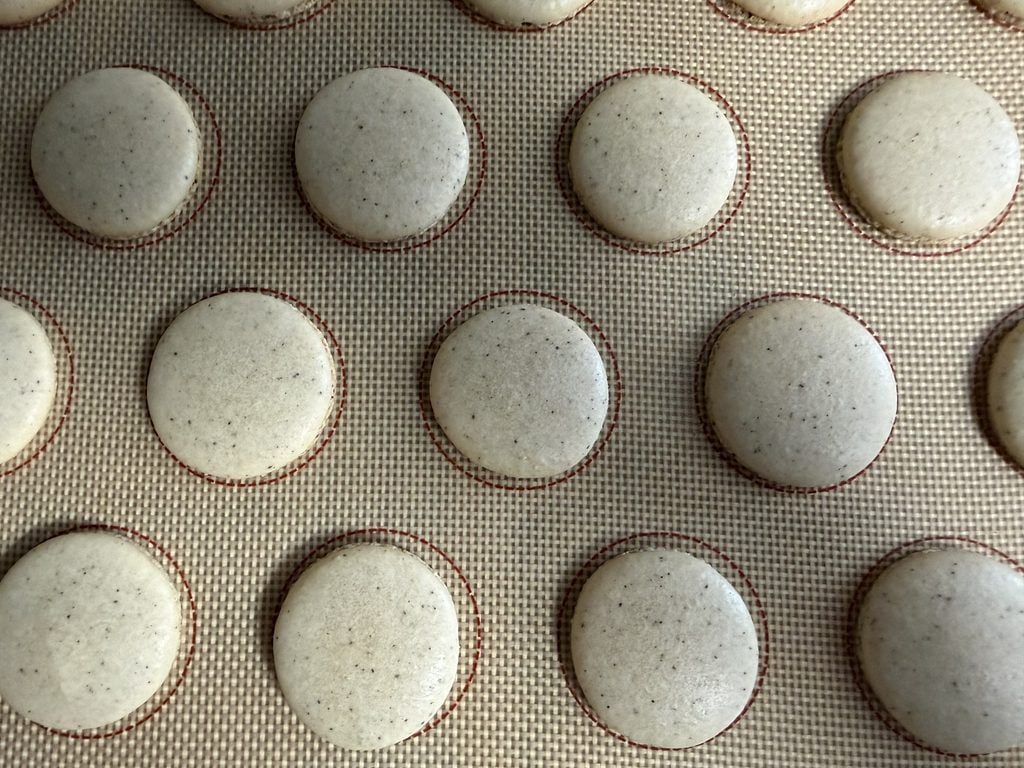
Once it’s ready, pipe the batter onto two baking sheets lined with silicone mats or parchment paper.
- I love silicone mats with printed circles- they’re reusable and help ensure even sizing and spacing.
- Let the macarons rest until a skin forms before baking.
Pro Tip: Macarons struggle to dry properly in humid weather. Use a fan or dehumidifier to speed up the process if needed, though you don’t want the fan blowing directly onto the shells.
Step 3- Bake the macarons
Bake at 300°F for 14 minutes (adjust as needed for your oven). The shells should feel dry to the touch and not be wiggly. Let them cool for 10 minutes at least before attempting to remove them from the pans or the tops may separate.
Step 4- Fill the macarons
Once the shells are cooled, it’s time to fill and decorate.
Filling and decorating the macarons
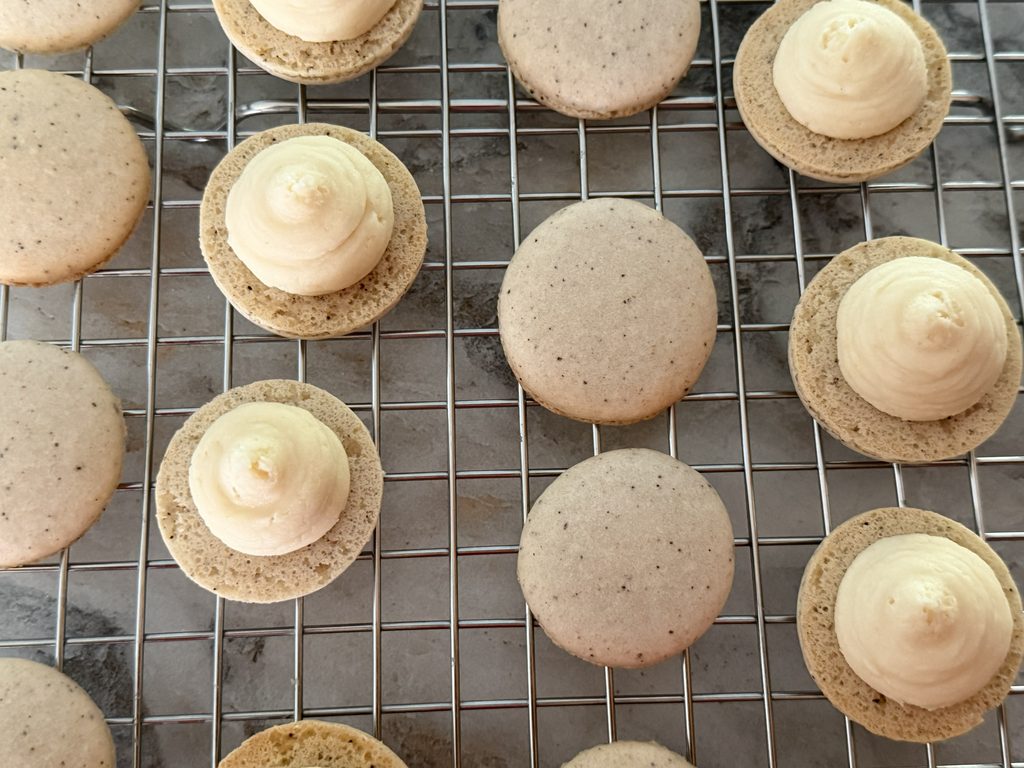
The filling is a simple coffee mascarpone filling. Once the shells have cooled down, you can start filling them. Once you’ve matched up the shells in pairs, you can start filling them. I like using the Wilton 2A round tip for these macarons. After you’ve piped filling for each pair, it’s time to sandwich them. Gently sandwich them together without pressing down directly on the shells as this could crack them. I like to use the flats of my fingers in a gentle, circular motion to help prevent cracks.
After sandwiching all the macarons, dust them with some cocoa powder, then pop them in the fridge to let them mature.
Want more protein? Have another macaron.
FAQs
For maximum flavor and freshness, store macarons in an airtight container in the fridge for up to a week. Layer them with parchment paper. Do not use wax paper as it will stick to the macarons. You don’t want to stack them too high as they are a delicate cookie.
To freeze the shells, first lay them in a single layer on a large baking sheet to freeze. Once frozen, transfer them to a freezer-safe container. Line the container with parchment paper, and put parchment paper on each layer of macarons. Freeze them for up to one month. Thaw the macarons in the fridge overnight and decorate as normal.
To freeze filled macarons, follow the same instructions. Not all filled macarons freeze well, due to the type of filling they have. Buttercream and ganache would freeze well. Fillings like jams or curds would not hold up well after being thawed out, so it is recommended not to freeze those types.
There are a couple reasons your macarons could be cracking. If you don’t give them a long enough resting period, they could crack. Remember, they need to be dry on top. Depending on your climate, this could take anywhere from 10 minutes to over an hour. If you don’t whip the meringue to stiff peaks, it will be weak thus making the macaron shells weak and more prone to cracking. You could also have an oven temperature that is too high. You may want to invest in an oven thermometer to be sure your oven is set to the right temperature.
The most common macaron mistakes usually come down to mixing and timing. Overmixing or undermixing the batter affects how the shells rise, while skipping the resting step, or not letting the shells develop the proper skin, can lead to cracked tops and missing feet. Using almond meal instead of finely ground almond flour, baking at the wrong temperature, or forgetting to tap out air bubbles can also prevent smooth, full shells. Mastering macaronage and giving the shells enough time to form a skin are key to getting that classic texture and structure.
More macaron recipes to try
If you made these, I’d love to know how they turned out. I’d also love it if you left me a star rating and a review.
Tiramisu French Macarons
Ingredients
- 105 grams egg whites
- 130 grams almond flour, finely ground and sifted
- 130 grams powdered sugar
- 75 grams sugar, castor or granulated
- 1/4 teaspoon cream of tartar
- 1/2 teaspoon espresso powder
Espresso Mascarpone Filling
- 8 ounces mascarpone cheese
- 1 cup powdered sugar
- 2 teaspoons espresso
- 1 tablespoon cornstarch
Instructions
- Line two baking sheets with parchment paper or silicone mats and set aside. Set up the piping bag to pipe the shells. Add a Wilton 12 tip to a piping bag, add this to a large cup, folding the tip up before adding it in, fold the top down around the cup.
- Weigh out the almond flour (130 grams) and the powdered sugar (130 grams). Add in 1/2 teaspoon espresso powder. Using a fine mesh sieve, sift the almond flour, powdered sugar, and espresso powder together in a large glass or metal bowl.
- Separate the egg whites (105 grams) into a separate small glass bowl. I like to pass the egg yolk back and forth between the cracked shell while the egg whites slip out into the bowl. It seems difficult at first, but the whites should separate pretty easily from the yolk.* I separate my egg whites either the day before or the morning of when I am going to make the macarons. This gives them some time to rest, which can contribute to a stronger meringue. That said, I have done it with less lead time and still had macarons that turned out fine.
- Add the egg whites and 1/4 teaspoon cream of tartar to the bowl of a stand mixer. You can also use a hand mixer, but it can be tough on your hands and arms. Beat the egg whites on medium speed until they are foamy and no longer liquid. The whisk should leave track marks in the foam. Turn the speed down and add the granulated sugar (75 grams) in three batches, waiting a few seconds between each addition.
- Once you've added in all of the sugar, turn the speed up to medium-high, which is between 4 and 5 on my KitchenAid stand mixer. You'll see the egg whites begin to build in volume and turn a glossy white color. The whisk will also start to leave track marks in the whites and it will look thick. After a few minutes, you can stop the mixer and check for stiff peaks. If the meringue runs off the whisk, it's not ready. Keep going for another few minutes and then check for stiff peaks. If it's almost ready at this point, I'll turn the mixer up a little bit higher and let it run for 30 seconds before checking again. When the meringue is done, it will form a stiff peak when you pull the whisk out. It may have a slight curve to it, but it should not flop over. If it does, continue mixing the meringue in 30-second bursts at the higher speed and checking for stiff peaks.
- Using a rubber spatula, add the meringue to the flour/sugar mixture in three batches. It won't mix together completely until you have added all of the meringue. Continue mixing until there are no dry ingredients. We are essentially deflating the meringue and making a cohesive batter. Once the dry ingredients are completely mixed in, use a circular motion with the spatula against the side of the bowl to continue mixing the batter. Do a few circles around the bowl, then bring the spatula through the batter. Do this process a few times, then check for the 'honey-like' stage. The batter should flow off the spatula like honey without breaking. You should be able to draw a figure eight with the batter that will sink into itself in 10 seconds when done. You don't want to overmix the batter, so check for doneness after every few passes.
- Once the macaronage is done, add it to the piping bag. Take the cup over to the lined baking sheets. Take the bag out and, holding the top closed just above the batter, squeeze the batter down gently so it just starts coming out. Hold it a bit sideways until you get over the baking sheets. Holding the bag upright, pipe the shells onto the baking sheets. If you are using the silicone mats with the stencils, you can aim for the dot in the middle of the circle. Squeeze the bag gently until the batter reaches the edge of the circle. Continue this process until you have filled the sheet pans or run out of batter. If you don't have the preprinted circles, just start from the top, going across before moving down. Leave about 2 inches in between each piped circle to allow it to spread out.
- Now that all the shells are piped, it's on to removing the air bubbles. Bang the trays firmly on your countertop a few times. This helps to dislodge the air bubbles in the shells. I also like to go through with a toothpick and pop any remaining air bubbles I find.
- Let the shells rest so they form their skin. This should take from 30-40 minutes. In humid weather, this can take longer. If the weather is really dry, it could take less time. When the skin is formed, you'll be able to touch the tops of the macarons without getting any batter on your finger. Preheat the oven to 300 F about halfway into the shells resting.
- Now that the shells have formed their skin, it's time to bake them. Bake the sheets individually in the oven on the middle rack at 300 F for 14 minutes. The tops will be matte and they will not jiggle on their feet when they are done. Remove them from the oven and let them rest for 10 minutes before removing them to a baking rack.* I like to add a sheet pan on the rack above the macarons. This helps to prevent browning of the macarons, which is especially helpful with lighter colors.
- When the shells are cooled, it's time to fill them. Match the shells by size. Flip one over of each pair. I like to use the Wilton star or round tip, but you can use whatever tip you like. Pipe the coconut filling onto the flipped over shell until all have been filled. Sandwich the shells together gently so as not to crack them.
- Let the filled macarons rest in the fridge for 24-48 hours before serving. This 'maturing' step allows the shells to soften slightly and develop their signature chewy texture.
Espresso Mascarpone Filling
- I like to use the paddle attachment on the stand mixer to make the filling. Add the 8 ounces of mascarpone to a mixing bowl, either to a stand mixer or hand mixer, depending on what you have. Beat the mascarpone until it is smooth, roughly two minutes. Add 1 cup of powdered sugar, 2 tablespoons espresso, and 1 tablespoon of cornstarch and mix on medium speed. If you are using a hand mixer, you may have to start with less powdered sugar so you don't get it everywhere.
Notes
- Beat egg whites just until stiff peaks form, then stop.
- Be careful not to overmix the batter. Once it flows like honey and passes the figure-eight test, stop mixing.
- Use only glass or metal bowls for the meringue. Plastic bowls can hold onto fat residue, which disrupts the meringue formation.
- Store macarons in the fridge in an airtight container for up to 1 week for maximum freshness.
Nutrition
About Author