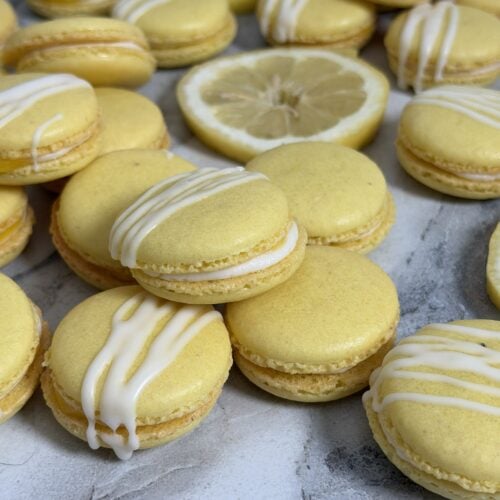
Lemon French Macarons
Sweet lemon curd surrounded by lemon buttercream in a lemon shell.
Print
Pin
Servings: 30 people
Calories: 97kcal
Ingredients
- 105 grams egg whites
- 75 grams granulated or castor sugar
- 130 grams almond flour, finely ground
- 130 grams powdered sugar
- 1/4 teaspoon cream of tartar
Filling
- 4 tablespoons butter, unsalted
- 1 1/4 cups powdered sugar
- 1 tablespoon milk or cream
- 1/4 teaspoon lemon extract
- 5 tablespoons lemon curd
Instructions
- Line two baking sheets with parchment paper or silicone mats and set aside. Set up the piping bag to pipe the shells. Add a Wilton 12 tip to a piping bag, add this to a large cup, folding the tip up before adding it in, fold the top down around the cup.
- Weigh out the almond flour (130 grams) and the powdered sugar (130 grams). Using a fine mesh sieve, sift the almond flour and powdered sugar together in a large glass or metal bowl.
- Separate the egg whites (105 grams) into a separate small glass bowl. I like to pass the egg yolk back and forth between the cracked shell while the egg whites slip out into the bowl. It seems difficult at first, but the whites should separate pretty easily from the yolk.* I do separate my egg whites either the day before or the morning of when I am going to make the macarons. This gives them some time to rest, which can contribute to a stronger meringue. That said, I have done it with less lead time and still had macarons that turned out fine. It is beneficial to complete this step ahead of time.
- Add the egg whites and 1/4 teaspoon cream of tartar to the bowl of a stand mixer. You can also use a hand mixer, but it can be tough on your hands and arms. Beat the egg whites on medium speed until they are foamy and no longer liquid. The whisk should leave track marks in the foam. Turn the speed down and add the granulated sugar (75 grams) in three batches, waiting a few seconds in between each addition.
- Once you've added in all of the sugar, turn the speed up to medium-high, which is between 4 and 5 on my KitchenAid stand mixer. You'll see the egg whites begin to build in volume and turn a glossy white color. The whisk will also start to leave track marks in the whites and it will look thick. After a few minutes, you can stop the mixer and check for stiff peaks. If the meringue runs off the whisk, it's not ready. Keep going for another few minutes and then check for stiff peaks. If it's almost ready at this point, I'll turn the mixer up a little bit higher and let it run for 30 seconds before checking again. When the meringue is done, it will form a stiff peak when you pull the whisk out. It may have a slight curve to it, but it should not flop over. If it does, continue mixing the meringue in 30-second bursts at the higher speed and checking for stiff peaks.
- Using a rubber spatula, add the meringue to the flour/sugar mixture in three batches. It won't mix together completely until you have added all of the meringue. Add three drops of violet gel food coloring to the batter. Continue mixing until there are no dry ingredients. We are essentially deflating the meringue and making a cohesive batter. Once the dry ingredients are completely mixed in, use a circular motion with the spatula against the side of the bowl to continue mixing the batter. Do a few circles around the bowl, then bring the spatula through the batter. Do this process a few times, then check for the 'honey-like' stage. The batter should flow off the spatula like honey without breaking. You should be able to draw a figure eight with the batter that will sink into itself in 10 seconds when done. You don't want to overmix the batter, so check for doneness after every few passes.
- Once the macaronage is done, add it to the piping bag. Take the cup over to the lined baking sheets. Take the bag out and, holding the top closed just above the batter, squeeze the batter down gently so it just starts coming out. Hold it a bit sideways until you get over the baking sheets. Holding the bag upright, pipe the shells onto the baking sheets. If you are using the silicone mats with the stencils, you can aim for the dot in the middle of the circle. Count to 4 while piping, then move on to the next circle. Continue this process until you have filled the sheet pans or run out of batter. If you don't have the preprinted circles, just start from the top, going across before moving down. Leave about 2 inches in between each piped circle to allow it to spread out.
- Now that all the shells are piped, it's on to removing the air bubbles. Bang the trays firmly on your countertop a few times. This helps to dislodge the air bubbles in the shells. I also like to go through with a toothpick and pop any remaining air bubbles I find.
- Let the shells rest so they form their skin. This should take from 30-40 minutes. In humid weather, this can take longer. If the weather is really dry, it could take less time. When the skin is formed, you'll be able to touch the tops of the macarons without getting any batter on your finger. Preheat the oven to 300 F about halfway into the shells resting.
- Now that the shells have formed their skin, it's time to bake them. Bake the sheets individually in the oven on the middle rack at 300 F for 14 minutes. The tops will be matte and they will not jiggle on their feet when they are done. Remove them from the oven and let them rest for 10 minutes before removing them to a baking rack.* I like to add a sheet pan on the rack above the macarons. This helps to prevent browning of the macarons, which is especially helpful with lighter colors.
- When the shells are cooled, it's time to fill them. Match the shells by size. Flip one over of each pair. Using a piping bag fitted with the Wilton 12 tip, pipe the lemon buttercream around the perimeter of the shell that's flipped over. You're creating a dam for the curd so it will stay in the center and not squeeze out too much. You don't want the dam to be flat, or it will allow the filling to leak out.
- Spoon a small amount of lemon curd, about 1/4 teaspoon, into the center of the dam you have piped on each shell. Use less if the shells are smaller. You don't want to go over the dam as this will allow the filling to squeeze out. It will take practice to get it right, but you can eat the mistakes so everybody wins!
- Let the filled macarons rest in the fridge for 24-48 hours before serving. This 'maturing' step allows the shells to soften slightly and develop their signature chewy texture.
Lemon Buttercream
- I like to use the paddle attachment on the stand mixer to make buttercream. Add softened butter to a mixing bowl, either for a stand mixer or hand mixer, depending on what you have. Beat the butter until it is smooth, roughly two minutes. Add 1 cup of powdered sugar and mix on medium speed. If you are using a hand mixer, you may have to start with less sugar so you don't get powdered sugar everywhere. The other benefit of the stand mixer is that the bowl has high walls, which helps to keep things more contained.
- The mixture will still look dry once you've added the powdered sugar. While the mixer is running, add 1 tablespoon of lemon juice. You will see everything start to come together. It will look almost too wet. Add in the 1/4 cup of powdered sugar and blend completely. The frosting should look thicker now. Give it a taste. It should have a bright, lemony taste. I prefer to use real lemon juice when making lemon frosting. I think it has a better flavor than lemon extract.
Notes
- Beat egg whites just until stiff peaks form, then stop.
- Be careful not to overmix the batter. Once it flows like honey and passes the figure eight test, stop mixing.
- Use only glass or metal bowls for the meringue. Plastic bowls can hold onto fat residue, which disrupts the creation of meringue.
- Store macarons in the fridge in an airtight container for up to 1 week for maximum freshness.
Nutrition
Calories: 97kcal | Carbohydrates: 15g | Protein: 1g | Fat: 4g | Saturated Fat: 1g | Polyunsaturated Fat: 0.1g | Monounsaturated Fat: 0.4g | Trans Fat: 0.1g | Cholesterol: 4mg | Sodium: 28mg | Potassium: 11mg | Fiber: 0.5g | Sugar: 14g | Vitamin A: 47IU | Calcium: 11mg | Iron: 0.2mg